MANLY PROJECT EDITION: Pipe Shelves
Ted and I live in a little old house that we love very much, but that is severely lacking in storage. We have a little hallway off the side of the kitchen that houses a nice shelving unit for all of our glassware and pretty things and knick knacks - that no one ever sees!!! We also store our bikes in there and can't fully open the door or walk in the dark without curse words being yelled...
We decided after seeing several examples of awesome DIY pipe shelves, what the hey? WE CAN DO IT!! We are going to now have a beautiful set of shelves to actually display our pretty glassware and lovely souvenirs and also some bar accouterments, ooh la la, in our dining room and become real grown-up entertainers!
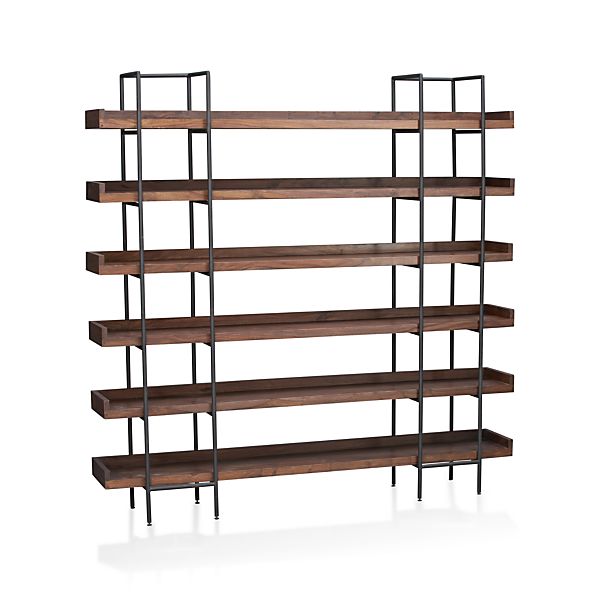
Granted, we DID consider purchasing something because sometimes we can be lazy, but the one at Crate and Barrel, which is similarly sized, would be $1500... no thanks! Ours cost less than 1/3 of that at $400.
Pipes in one length for the bars extending from the wall to the outer pipe
Tee-joints connecting each length of pipe to the pipe that attaches to the wall
Elbow-joints if you want the top to not have an open joint
Flanges to place on the wall and the floor
Lumber cut to size (ours is 2" thick and 10" deep)
Dish Soap
Spray Paint
Sandpaper
Stain
Wood screws
Drill
First step: measure!! And measure again!! We have a little lip in our ceiling which was a perfect starting point to determine how big it should be, but we did forget to take into account the joints so we ended up losing a section that we had originally planned for. The joints will add anywhere from 1"-2", so keep that in mind! Also be sure to take note of anything like electrical outlets or gas pipes when deciding where your shelves should go! I wanted one toward the bottom because otherwise it just looks a little odd, then one about waist height, and then a couple more up higher in case we have little humans running around at some point who think, "ooh, I also like the look of that fancy glassware!" Also, use a stud finder to determine how many "columns" your shelves will have. We decided to only attach our shelves to the walls, and then have little feet on the bottom, rather than screwing them into the hardwood, so we don't permanently ruin our floors. In order to have big heavy shelves actually stay on the wall, you must drill into the studs! Luckily, we had friends who just so happened to purchase a stud finder recently, so that cost us $0!
Next step: head over to your local Home Depot for the supplies. Did you know that Home Depot can cut not only wood planks to size, but also pipes as well as thread the ends? It's wonderful! We only needed one custom sized pipe length (30"), and it was done very quickly!
When you get the pipes, you'll notice that your hands feel like a mechanic's, and they're covered in black oily goo. You will need to take your dish soap, possibly a sponge and a bucket, and scrub those suckers until they don't feel gross. I highly recommend dishwashing gloves for this - I did not wear any, and I got a terrible case of dishpan hands! Also my delicate lady hands got a little torn up by the bits of metal sticking out, so it wasn't the most pleasant. When those are dry, spray paint them black (or a fun color, if you want!) so they all match - the pipes and joints will range from silver to black on their own, and you likely won't get all the pipes in the same color, so this is why you should paint them.


Sand the edges of the wood where it was cut so no one hurts themselves at a dinner party, and then lay them out to stain. We got a really pretty dark stain to go with our dining table, and also a clear lacquer to go over that.

The hard part, we thought, was assembling the pipe columns. It seems like an easy enough project, but the pipes don't all screw in to the exact same height, and you really do want the shelves to be level - we're trying to make this LOOK like we bought it, folks! But at a fraction of the cost! (Sadly, the cost has also included one injury - everyone be careful when wielding large pipes near your face! Our favorite Facebook comment on that injury: "It was Col. Mustard, in the dining room, with the lead pipe!") Be sure to get out your handy level before making any holes in your walls, and screw/unscrew the pipes until they all line up.


Once they're all lined up, attach them to the wall - this sounds like the easy step, but no!! We invited my favorite handy brother over, who has helped on numerous other projects in this blog and who we can thank to no end, to come over and provide services to be repaid in beer. It took a few hours and some elbow grease, but everything actually got lined up perfectly on the walls and no shelves are wonky! We hung up 2 of the columns, added the shelves, made adjustments to be 100% certain the shelves were level, and then added the third column.

Hours spent cleaning and assembling pipes: 3
Hours spent staining and lacquering shelves: 2 (plus allowing to dry overnight)
Hours spent attaching the pipes to the wall: 3.5
Having a custom set of super fancy one-of-a-kind shelves: Priceless!

We decided after seeing several examples of awesome DIY pipe shelves, what the hey? WE CAN DO IT!! We are going to now have a beautiful set of shelves to actually display our pretty glassware and lovely souvenirs and also some bar accouterments, ooh la la, in our dining room and become real grown-up entertainers!
Granted, we DID consider purchasing something because sometimes we can be lazy, but the one at Crate and Barrel, which is similarly sized, would be $1500... no thanks! Ours cost less than 1/3 of that at $400.
Materials
Pipes in differing lengths for the height (all of our pipes have a 1/2" diameter)Pipes in one length for the bars extending from the wall to the outer pipe
Tee-joints connecting each length of pipe to the pipe that attaches to the wall
Elbow-joints if you want the top to not have an open joint
Flanges to place on the wall and the floor
Lumber cut to size (ours is 2" thick and 10" deep)
Dish Soap
Spray Paint
Sandpaper
Stain
Wood screws
Drill
First step: measure!! And measure again!! We have a little lip in our ceiling which was a perfect starting point to determine how big it should be, but we did forget to take into account the joints so we ended up losing a section that we had originally planned for. The joints will add anywhere from 1"-2", so keep that in mind! Also be sure to take note of anything like electrical outlets or gas pipes when deciding where your shelves should go! I wanted one toward the bottom because otherwise it just looks a little odd, then one about waist height, and then a couple more up higher in case we have little humans running around at some point who think, "ooh, I also like the look of that fancy glassware!" Also, use a stud finder to determine how many "columns" your shelves will have. We decided to only attach our shelves to the walls, and then have little feet on the bottom, rather than screwing them into the hardwood, so we don't permanently ruin our floors. In order to have big heavy shelves actually stay on the wall, you must drill into the studs! Luckily, we had friends who just so happened to purchase a stud finder recently, so that cost us $0!
Next step: head over to your local Home Depot for the supplies. Did you know that Home Depot can cut not only wood planks to size, but also pipes as well as thread the ends? It's wonderful! We only needed one custom sized pipe length (30"), and it was done very quickly!
When you get the pipes, you'll notice that your hands feel like a mechanic's, and they're covered in black oily goo. You will need to take your dish soap, possibly a sponge and a bucket, and scrub those suckers until they don't feel gross. I highly recommend dishwashing gloves for this - I did not wear any, and I got a terrible case of dishpan hands! Also my delicate lady hands got a little torn up by the bits of metal sticking out, so it wasn't the most pleasant. When those are dry, spray paint them black (or a fun color, if you want!) so they all match - the pipes and joints will range from silver to black on their own, and you likely won't get all the pipes in the same color, so this is why you should paint them.


Sand the edges of the wood where it was cut so no one hurts themselves at a dinner party, and then lay them out to stain. We got a really pretty dark stain to go with our dining table, and also a clear lacquer to go over that.

The hard part, we thought, was assembling the pipe columns. It seems like an easy enough project, but the pipes don't all screw in to the exact same height, and you really do want the shelves to be level - we're trying to make this LOOK like we bought it, folks! But at a fraction of the cost! (Sadly, the cost has also included one injury - everyone be careful when wielding large pipes near your face! Our favorite Facebook comment on that injury: "It was Col. Mustard, in the dining room, with the lead pipe!") Be sure to get out your handy level before making any holes in your walls, and screw/unscrew the pipes until they all line up.

Hours spent cleaning and assembling pipes: 3
Hours spent staining and lacquering shelves: 2 (plus allowing to dry overnight)
Hours spent attaching the pipes to the wall: 3.5
Having a custom set of super fancy one-of-a-kind shelves: Priceless!


Comments