MANLY PROJECT EDITION: Panel Wall
 Our home was built in 1955, and I'm sure has gone through many changes over the nearly 60 years it's been around! It has certainly gone through a lot in the past 4 years with me and Ted, but it's all for the better, we like to think ;) One of the changes we recently have been focusing on is the living room. It came with a faux fireplace! Once upon a time, the fireplace and chimney were connected and we could've had a warm wonderful fire for the 2 weeks of winter that Texas has, as Ted likes to say... even though I get chilly under 80 degrees, so I may have enjoyed a fireplace! But by the time we met, the faux fireplace was merely a box atop a brick platform that extended into my craft room. When we finally decided to turn that room into a guest room by installing a murphy bed, we had to demolish the fireplace box. This meant our beautiful box from which we hung our stockings with care at Christmastime was now a blank wall. A little dull, we thought!
We took six (6!!) trips to Home Depot within 24 hours (5 were within 8 hours). Our first trip to Home Depot we purchased the wood, bought some tools like a drill and a saw, which we constantly have to borrow so it was a good investment, and the paint and stain. Our second trip was for a stud finder and some clamps. Our third was for a drill bit and to rent a nail gun - fourth and fifth were to a separate Home Depot for said nail gun! We finally started assembling the wall and put up the wood when we realized we'd only bought half of the amount we actually needed, so trip #6 was for more wood. MEASURE, PEOPLE!! It was quite a day!!
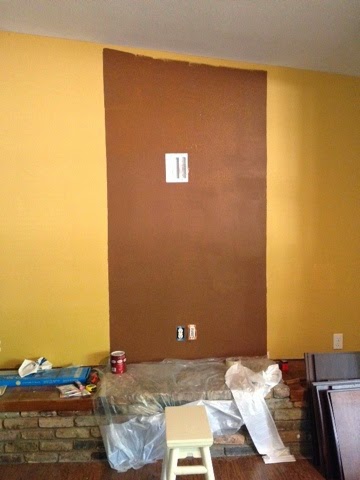 First, we bought 4" wooden planks and cut them to size at Home Depot. Then we brought them home and sanded and stained them. In the meantime, I'd read on the internet that it's handy to paint the wall behind the wood a brown color so any imperfections won't be glaringly obvious - thanks internet!! So I went ahead and painted a nice big square on the wall.
 After letting the planks dry overnight, we started attaching them to the studs and various wall spots with the nail gun.
We had a bit of an issue with our original plan of cutting out nice sized holes for the electrical socket, and instead Ted used our fancy new saw to cut out notches for the 2 bottom electrical outlets. They're very unassuming, perfect!!
After all was said and done, and I'll mention here that none of it could've been done without saying the "magic words" all day long (usually of the 4-letter variety!), our wall paneling turned out just as we'd hoped!
Last step: adding shelves to hold the PlayStation and other items (and yes, stockings at Christmastime!).
Side by Side Before and After:

Update:
We finally added the last 2 shelves below the TV and placed some knick knacks on it, and used an extra length of shelf for the opposite wall above our couch for more pictures and things! Turned out quite lovely!
.JPG)
.JPG)


Comments